living in the question...

Thursday, November 17, 2011

wordpress: Setting up wordpress CMS on localhost

By on 9:16 PM
The article is based on the previous article in which we setup apache, mysql environment for php development. Which can be read here Configure windows for php development. Now that you have running mysql, apache environment its very easy to test any php based CMS. Like Drupal, Joomla, Wordpress etc. The following is a demonstration showing installation of wordpress on such a configured pc/local server.
1. Go to http://www.wordpress.org and download the latest version of Wordpress
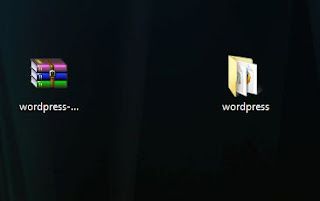
2. Unzip the content of the folder


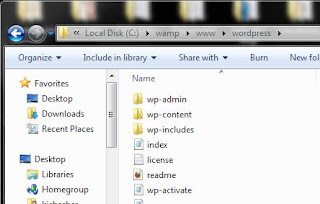
3. Move the unzipped folder to c:\wamp\www or the root directory of your localhost
4. Browse http://localhost/Unzipped-Folder-Name
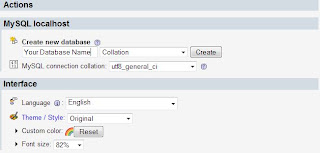
5. As wamp is running browse to http://localhost/phpMyadmin/ and create a database
6. Provide the database Name, user name (by default root), password(by default empty),  host(localhost), if you want multi-sites provide prefix for the tables(anything)


 You will be prompted for installation of wordpress. Just follow the steps and do next. You will end up with the latest wordpress installed on your localhost. In the steps you will be prompted to give website name etc. Just follow as it says. That's all for your wordpress installation.

To access your newly created localhost wordpress website.
  • Browse http://localhost/Your-Unzipped-Folder-Name in WWW folder. This is the folder in which you have jsut install your wordpress. In the above demonistration it is http://localhost/wordpress
  • To go to your wordpress dashboard browse to http://localhost/Your-Unzipped-Folder-Name/wp-admin and provide the credentials you setup while installation.
  • See around wordpress dashboard. The wordpress dashboard is very powerful in the sense you can create beautiful websites right from the dashboard.

 That's all for basic installation of wordpress. After getting accustomed to the functionality and routine of wordpress you will come to know the strengths of wordpress, and of course will love it as it is an open source and free to customization. Moreover, there are lots and lots of beautiful resources out there in the market in very reasonable prices.

Detailed documentation of wordpress is available on wordpress officail website you can start from Wordpress Documentation


Colors: Combination of Red with different Colors

By on 7:36 AM
 
Some interesting combinations of Red
Red color is used very frequently in graphics. I like red with mostly white and black. Some other experimentation of few combinations are mentioned. Hmmm, Interesting :)

Wednesday, November 16, 2011

graphics: Understanding general concept of masking in desingning tools e.g. Photoshop, Fireworks etc

By on 9:38 PM
Have you ever come across the word masking. I always used to get scared to hear the word when I started using different designing tools. Actually, the concept of mask is very simple and powerful. The following illustration will make it clear why we use masks in designing.
1. How to entangle these, The simplest application of masking
2. Oops Not entangled

3. Lets Duplicate the blue and sandwich the red...
4. Here comes in the concept of Mask why not mask. Mask equivalent to Hiding a portion...


5. Drag the unmasked or the unhidden portion of duplicate pic over orignal
6. Yup. There it is. The portion overlapping is masked away...

Friday, November 4, 2011

wordpress: How to make your own wordpress Dashboard Widget

By on 10:59 AM
Wordpress is one of the leading open source php CMS. It is very simple and highly customizable. Within the dashboard of Wordpress the whole cms can be customized very easily. Different themes can very easily be applied to your website through the Wordpress dashboard. Advance user can develop their own theme and put the files in \site\wp-content\themes folder to apply it to the website from the Wordpress dashboard. http://www.wordpress.org provides a very comprehensive documentation on Wordpress development and implementation.

In this article I will just show you how easily you can make your own custom Wordpress Dashboard widgets. For the purpose you just need to edit only one file from the theme base folder and that is functions.php. The file can also be edited from the wordpress dashboard editor sub-menu under the appearance.
For the Custom Dashboard Widget you just need to include the following functions into your functions.php file and thats all...

//What your Widget Does
function yourDashboarFunction() {
    // This is the space where you can do anything you want to include in the widget.
    echo "For now just say Hello World";
}

//Creat your hook
function yourDashboardwidget() {

 wp_add_dashboard_widget('YourWidget', 'Your Widget Title', 'yourDashboarFunction');
}

//hook your widget
add_action('wp_dashboard_setup', 'yourDashboardwidget' );
Now go to your Wordpress Dashboard and there it is your widget among the Dashboard widgets. You can Do complex things inside yourDashboardFunction().

php: Setting up your pc for php development

By on 8:41 AM
Hello! The post is especially for fellow developers who want to set up PHP development environment in windows 7 or xp. There are a number of platforms which provide easy php development environment in windows. But I am going to discuss which I prefer the most for a smooth and well managed php project management. Just follow the following steps and get started with a comfortable environment to put your programming capabilities to work...
 1. Download and Install latest wampServer from their official website. WampServer is an open source project created by a team of PHP developers. It includes all the basic applications for web development e.g.
 - Apache
  - Php
  - Mysql
  - PhpMyadmin
  - SQLBuddy etc.

2. The second thing needed for smooth php or any web development is an editor to write the php codes. The simplest can be Notepad provided with any windows. For better development I would prefer one of the following editors.
  Eclipse IDE for PHP developers or NetBeans IDE.
Eclipse is an open source community as well as NetBeans Community Distributions are available under a Dual License consisting of the Common Development and Distribution License (CDDL) v1.0 and GNU General Public License (GPL) v2. See the third-party readme for external components included in NetBeans and their associated licenses
Both of the IDE provide awesome intellisense for any kinds of development including PHP development. If you plan development as career than personally I would recommend complete setup of any one of them as must have.

Now when both of them are successfully installed. Your computer is ready for a smooth web development. Open a new PHP project in NetBeans IDE and publish it to the WWW folder created in the wamp installed folder. That's all now you are ready to make use of your previous programming knowledge to implement in PHP with minor modifications which any easy tutorial from the web would guide through.